
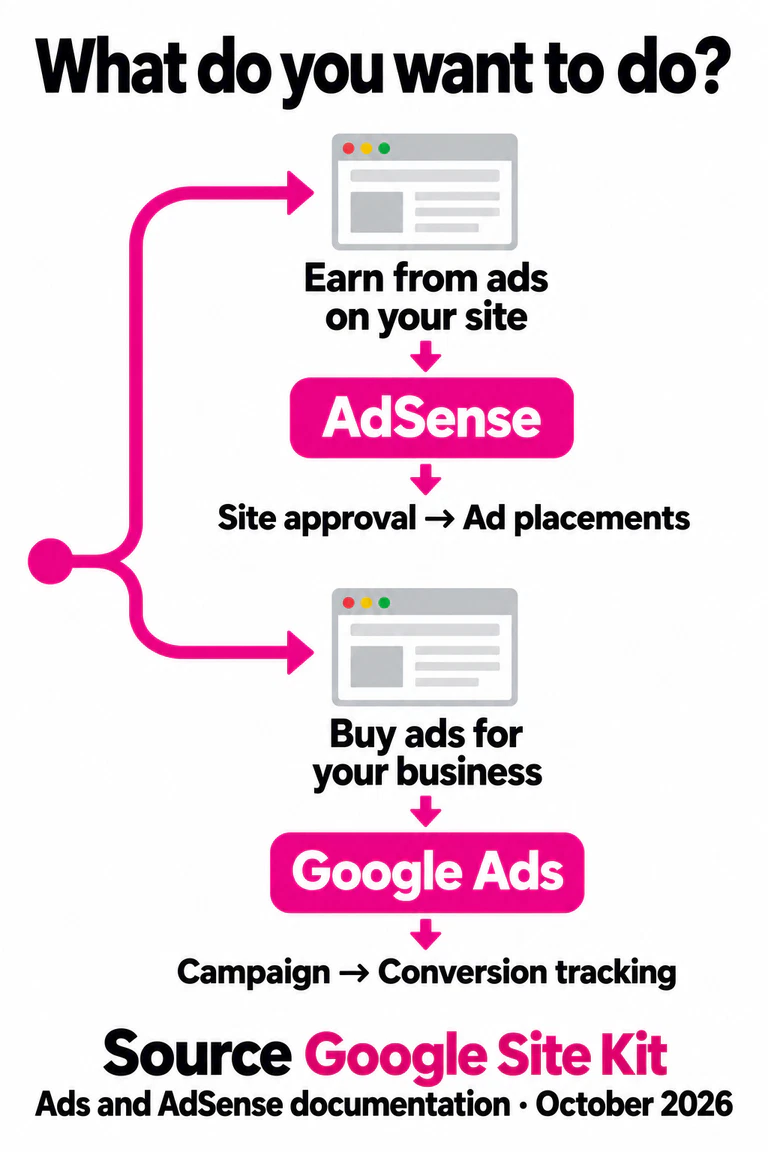
Both can connect through Google’s free Site Kit plugin. Choose the relevant route below: publishers need an approved AdSense site and ad placements; advertisers need a campaign and a conversion that measures a completed sale, enquiry or other useful action.
These instructions cover WordPress sites where you can install plugins. On WordPress.com, check your plan before buying anything: its current header-code instructions support Personal, Premium, Business and Commerce, while free sites require an upgrade. WordPress.com’s own WordAds programme is a separate option on Premium and above.
Show AdSense ads on your WordPress site
1. Connect the site. In WordPress, open Plugins → Add New, find Site Kit by Google, install it and activate it. Complete Site Kit’s initial setup with the Google account you intend to use. Then connect AdSense from the dashboard or Site Kit settings. Google’s WordPress integration guide recommends allowing Site Kit to place the AdSense code.
2. Complete AdSense approval and enable Auto ads. Follow the outstanding actions in your AdSense account. Connecting the plugin does not approve the site. Auto ads must be enabled in AdSense itself: Site Kit can add the code but cannot change that account setting. If no ads appear, check that Site Kit reports Code has been placed, that the site is listed in AdSense, and that approval or other required actions are complete.
3. Review the placements. Check real article pages on a phone as well as a computer. An ad that breaks a paragraph, covers navigation or overwhelms a short page is a poor trade for the reader. Start with a manageable layout rather than treating every available space as inventory.
Do not paste an AW- tracking ID into the site expecting it to display advertisements. That belongs to the advertiser route. And do not set an income target from a plugin screenshot: the traffic needed to earn $1,000 from display ads depends on the revenue per thousand pageviews you actually receive.
Run Google Ads for a WordPress business
WordPress provides the destination page for your campaign. You do not need an ad slot on that page to advertise the business. Prepare a page that explains the offer and lets a visitor buy, enquire or book before paying to send people to it.
Site Kit now documents a guided campaign setup as well as connecting an existing account. Open Site Kit → Settings → Connect More Services → Set up Ads. With an existing Google Ads account, enter its Conversion Tracking ID and complete manual setup. To start a new account and campaign, follow the guided flow. Google’s Ads module instructions explain both routes and where to find the ID under Google Ads → Tools → Data Manager → Google tag.
For a WooCommerce shop, check whether Google for WooCommerce already handles the Ads connection. Site Kit prevents reusing the same conversion ID for its manual Ads setup when that ID is already linked through Google for WooCommerce. Keep one clear owner for the implementation rather than adding a second plugin to an existing connection.
The Site Kit route is useful when you want guided setup. Use Google Tag Manager when you need to control custom events or maintain several tags. Neither choice makes the campaign profitable by itself. The important next decision is what the campaign should count as a result.
Track a completed action, not just a visit
Choose the action before configuring the tag. For a lead-generation site, a successful enquiry is usually more informative than a click on the Submit button: the form could reject the submission or fail to send it. For a shop, measure the completed order and its value rather than an opening of the checkout page.
Use Site Kit’s supported plugin events when they fit. In Site Kit → Settings → Connected Services → Ads → Edit, review Plugin conversion tracking. It supports a defined list, including Contact Form 7, WPForms, Ninja Forms and WooCommerce. This setting is shared with the Analytics module. It is not a promise that every form plugin or custom checkout is covered; check the current supported plugins and the event your site produces.
Use a URL conversion for a genuine confirmation page. In Google Ads, open Goals → Conversions → Summary, create a website conversion and select the Google tag as its source. Google’s web-conversion setup offers a no-code URL method once the tag is installed. Use an exact confirmation URL when possible. A page anyone can reach without completing the action, or a broad match such as every URL containing “thank-you”, can count the wrong visits.
Use an event when the result needs more detail. URL-based measurement cannot supply transaction-specific values or order IDs. For purchases, custom form-success events or other precise actions, use the relevant integration or a configured event tag. GA4 is an optional source of conversions, not a prerequisite for the direct Google Ads tag route.
If you choose Tag Manager, Site Kit’s Tag Manager module can place the container on WordPress. Connect the intended account and container, then configure the tags in Tag Manager. A GTM- container ID is not your Google Ads Conversion ID; it identifies the container that holds the tags.
Google’s conversion-tag instructions require the conversion’s ID and label, with a trigger for the action you want to measure. Supply actual value, currency and transaction ID where applicable. Create a manual conversion action when you need a standalone label; automatically created actions do not provide one. Configure the Google tag as well. If it already loads on every page, Google says a separate Conversion Linker tag is unnecessary.
In Preview and Tag Assistant, complete one valid submission or order and check the resulting event. Then try a rejected form submission and confirm it does not report success. Review the conversion’s settings in Google Ads before publishing the container. Avoid making both a direct Ads conversion and an imported GA4 version of the same outcome bidding goals: decide which is the main measurement. Custom goals can also make secondary conversions biddable, so check the campaign’s selected goal, not only the action’s label.
Configure consent for the route you use
For Site Kit’s Ads or Analytics implementation, open Site Kit → Settings → Admin Settings and review consent mode. Its consent instructions require both WP Consent API and a compatible consent-management plugin. WP Consent API communicates choices between plugins; it does not display a consent banner or collect permission on its own. If Site Kit manages consent mode, avoid also enabling a second consent-mode implementation in the banner plugin.
For AdSense, apply the publisher requirements separately. Google requires a Google-certified CMP integrated with the IAB TCF when serving personalised ads to users in the EEA, UK or Switzerland. Installing Site Kit, adding ad code or activating WP Consent API does not satisfy that requirement by itself.
Finish by checking the outcome you came for. Publishers should see appropriate ad placements after approval, without losing page usability. Advertisers should have a working landing page and a tested conversion for the completed action, with consent choices respected. Add further reporting or optimisation tools when they solve a specific need.